Do You Cut Above or Below the Node to Propagate? Essential Tips for Successful Plant Propagation

Propagating plants can be a rewarding endeavor, but understanding the basics is crucial for success. One common question among gardeners is whether to cut above or below the node when taking cuttings. The node is the critical point where new growth can emerge, making it essential for propagation. In this article, we'll explore the best practices for cutting techniques, highlighting the reasons behind choosing the right cutting method. Whether you're a novice or an experienced gardener, these essential tips will help you maximize your chances of successful plant propagation and cultivate a thriving green space.
Do You Cut Above or Below the Node to Propagate?
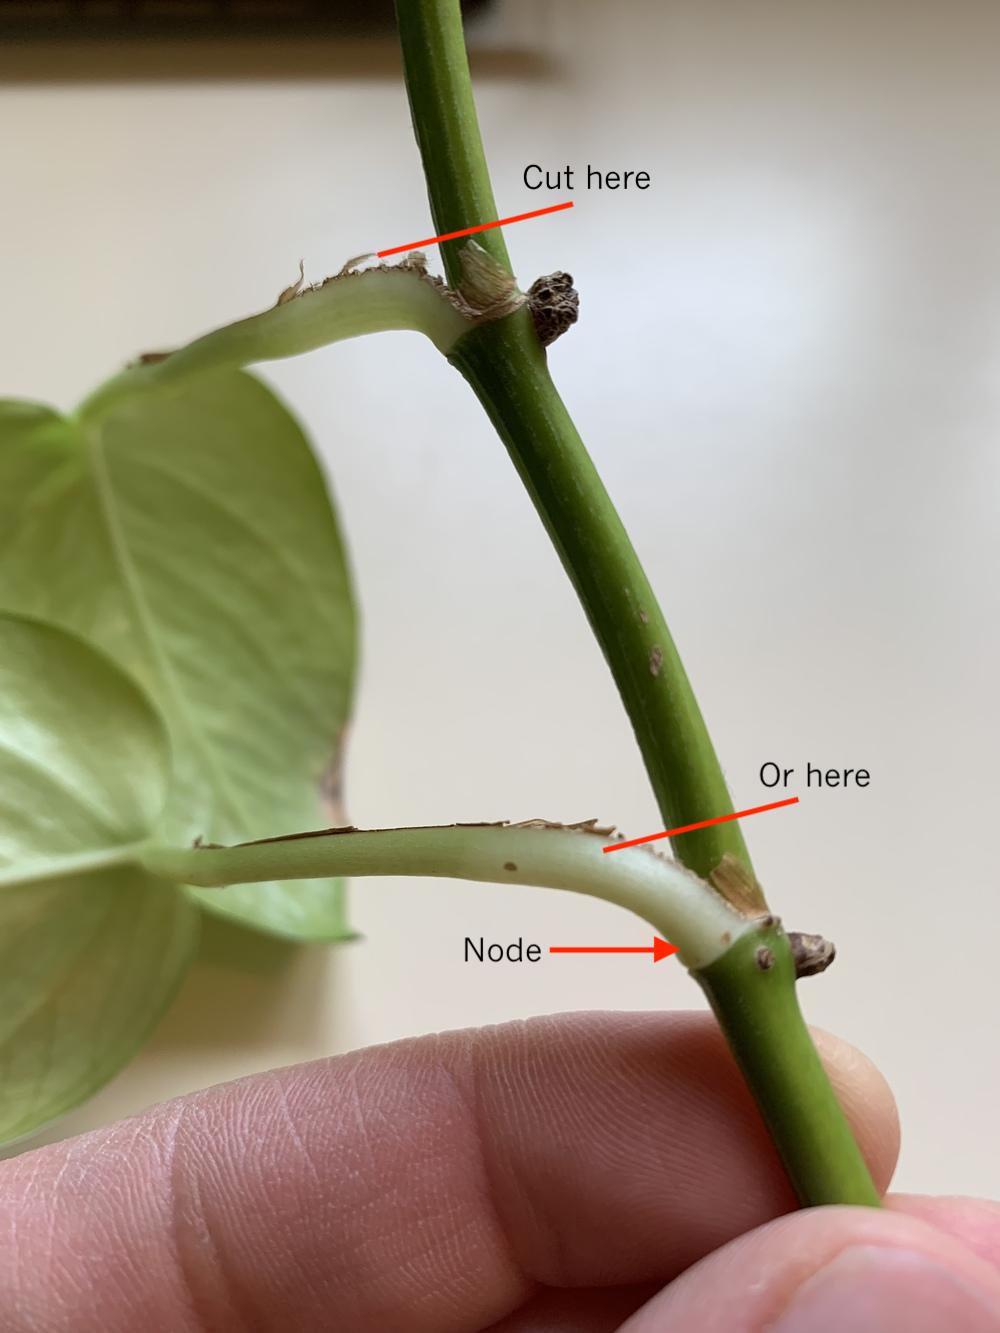
When it comes to plant propagation, understanding where to make your cuts is crucial for successful growth. Generally, it is recommended to cut just below the node when taking a cutting from a plant. The node is a critical area that contains the potential for new root and shoot growth, as it holds meristematic tissue. By cutting below the node, you ensure that this vital tissue is included in your cutting, which can enhance the likelihood of successful propagation. Moreover, this location provides the cutting with necessary hormones that facilitate root development, thereby increasing the chances of your new plant thriving.
Understanding Plant Nodes
A node is a part of the plant stem where leaves, branches, or flowers originate. It plays a pivotal role in the plant's growth and development. Nodes produce auxins, a group of plant hormones that are essential for promoting root formation and growth. This is why knowing the anatomy of the plant helps you identify the best points for taking cuttings. Each node is a potential growth point, and cuttings made at or below the node have a higher chance of thriving because they retain the natural growth properties of the plant.
Why Cut Below the Node?
Cutting below the node is advantageous because it retains the area where the plant's hormones are concentrated. This location encourages the development of roots after the cutting is placed in soil or water. By making the cut below the node, you ensure that the cutting is capable of utilizing these natural growth factors, which significantly enhances its ability to adapt and grow into a new plant. Additionally, this method reduces the risk of the cutting dying back due to lack of energy and resources, which can happen if taken too far from the node.
Techniques for Taking Cuttings
Several techniques can be employed when taking cuttings, but the basic idea remains the same: always ensure your cut is made just below the node. Use a clean, sharp tool to make a diagonal cut, as this increases the surface area for the plant to absorb moisture and reduces the risk of disease. After cutting, it is often recommended to dip the end of the cutting in rooting hormone to boost its chances of developing roots quickly. Place the cutting in a suitable medium promptly to provide the best conditions for it to establish roots.
Best Plants for Node Cutting
Many plants can be propagated from cuttings taken at the node, particularly herbaceous and some woody plants. Popular choices include pothos, basil, and rosemary. Each of these plants has nodes that contain potent growth hormones and can sprout roots relatively easily when cut properly. Understanding which plants respond best to node cuttings can greatly increase your success rate in propagation, allowing you to expand your garden or share plants with others effectively.
Common Mistakes in Propagation
A common mistake in propagation is cutting above the node, which can lead to unsuccessful rooting and stunted growth. Many novice propagators may not realize the importance of the node and may end up with cuttings that fail to thrive. It is also essential to ensure that the cutting has sufficient leaves to provide photosynthesis while root development occurs. Additionally, using the wrong medium or not providing adequate moisture can further hinder the propagation process. By being mindful of these factors and focusing on cutting below the node, you can dramatically enhance your propagation results.
| Factors | Importance |
|---|---|
| Node Location | Critical for root hormone concentration |
| Cutting Technique | Influences rooting success |
| Plant Selection | Affects ease of propagation |
| Medium | Provides support and moisture |
| Lighting Conditions | Essential for photosynthesis during root growth |
Should I prune above or below a node?
Pruning is a crucial technique in gardening and horticulture, allowing for the careful management of plant health and growth. The question of whether to prune above or below a node is significant for achieving optimal results in plant care.
When pruning, it is recommended to cut just above the node instead of below it. The node is the part of the stem where leaves are attached, and it contains specific cells that help in the growth of new shoots. Pruning above the node encourages the tree to grow more actively from that point, thereby promoting healthier growth. If you cut below the node, you risk leaving an open wound that may become a site for disease and decay. Therefore, understanding where to make your cuts is essential for guiding the plant's development effectively.
Understanding Nodes in Plants
Nodes are critical components of a plant's anatomy. A node is the part of a stem that forms a joint and is the location where leaves, branches, or flowers grow.
See also:
- Significance: Nodes are essential for the growth and development of plants as they produce new tissues.
- Identification: Nodes can be identified by the presence of leaves or buds; they appear as bumps or swellings on the stem.
- Functionality: At nodes, the growth of the plant is more active, which is why pruning above the node can help develop new growth quickly.
Benefits of Pruning Above a Node
Pruning above a node has several advantages that can enhance plant health and structure.
- Encourages New Growth: Cutting above the node promotes the plant to produce new shoots from that node.
- Reduces Infection Risk: A cut above the node minimizes the open wound area, reducing the likelihood of pathogens entering the plant.
- Improves Aesthetic Shape: Pruning strategically at nodes can create a more aesthetically pleasing shape for shrubs and trees.
Consequences of Pruning Below a Node
Pruning below a node can lead to unfavorable outcomes and impede the health of the plant.
- Increased Wound Size: Cutting below results in larger wounds, which are more susceptible to infection and decay.
- Reduced Growth Potential: The plant could struggle to generate new growth in areas where nodes are cut away.
- Encouragement of Suckers: Pruning incorrectly can lead to sucker growths that detract from the main structure of the plant.
Proper Pruning Techniques
Adopting the right pruning techniques is vital for ensuring the health and longevity of a plant.
- Use Sharp Tools: Always utilize sharp and clean pruning shears to make a clean cut, preventing damage to the plant.
- Angle of Cut: Make cuts at a slight angle above the node to facilitate better drainage and prevent moisture accumulation.
- Timing: Choose the right time of year to prune, as some plants thrive when pruned during their dormant season.
Common Mistakes to Avoid
Avoiding common pitfalls is essential for effective pruning and plant care.
- Neglecting Node Awareness: Not understanding where the nodes are can lead to ineffective pruning cuts.
- Over-pruning: Removing too much foliage can stress the plant and inhibit its ability to photosynthesize effectively.
- Ignoring Plant Type: Different plants have unique pruning requirements; always consider the specific needs of the plant species.
Do you cut clones above or below node?

When it comes to cutting clones, the general practice is to cut just below the node. This technique is essential for the successful propagation of plants. The node is the part of the stem from which leaves, branches, and roots grow. By making the cut below the node, you ensure that the plant has a better chance of developing roots from this area. This is primarily because the node contains the necessary cells that can transform into rooting cells when conditions are right.
Importance of the Node in Cloning
The node plays a crucial role in the cloning process for several reasons:
- Root Development: Nodes are where the plant's growth begins, and cutting below the node allows new roots to emerge.
- Nutrient Transfer: The area around the node has a higher concentration of nutrients, which aids in successful cloning.
- Structural Integrity: Cutting too far from the node can destabilize the clone, making it difficult for it to thrive.
Techniques for Cutting Clones
There are several techniques you can employ when cutting clones for optimal results:
- Clean Cuts: Use sterile, sharp scissors or a blade to make a clean cut just below the node to minimize stress.
- Angle of Cut: A slight angle can expose more surface area for root development.
- Length of Cutting: A cutting of about 4-6 inches is ideal, with at least one node included.
Aftercare for Cloned Cuttings
Proper aftercare is essential for cloned cuttings to thrive:
- Humidity Control: Keep the cuttings in a humid environment to prevent them from drying out.
- Temperature Management: A warm but not hot environment helps stimulate root growth.
- Light Exposure: Provide indirect light to encourage growth without overwhelming the young plants.
Common Mistakes When Cloning
Identifying common mistakes can improve cloning success rates:
- Cutting Too High: Cutting above the node can lead to failures due to the lack of root-forming cells.
- Not Using Hormones: Missing out on rooting hormones can slow down the process of root development.
- Improper Watering: Overwatering the cuttings can lead to rot, while under-watering can cause them to wilt.
Benefits of Cloning Techniques
Using proper cloning techniques offers several advantages:
See also:
- Genetic Consistency: Clones will exhibit the same characteristics as the parent plant.
- Cost-Effective: Cloning is often more cost-effective than purchasing new plants.
- Speed of Propagation: Cloning can be a quicker process compared to seed germination.
Do you cut above or below Monstera node?

When it comes to propagating the Monstera plant, a crucial decision is whether to cut above or below a node. The node is the part of the stem where leaves and roots grow. Making the right cut is essential for successful propagation and growth of new plants.
Understanding the Node
The node is a vital part of the Monstera stem that serves multiple functions:
- Growth Points: Nodes are where new leaves and roots emerge.
- Functionality: They play a significant role in the plant’s overall health and development.
- Propagation: For successful propagation, cutting just below the node allows for root development.
Cutting Below the Node
Cutting below the node is generally recommended for propagation:
- Root Development: This area has the potential to develop roots more effectively.
- Node Integrity: Preserving the node helps ensure the plant can produce new leaves.
- Healthier Cuttings: A cutting made below the node tends to be healthier and more robust.
Cutting Above the Node
While cutting above the node is less common, it can also be done under certain circumstances:
- Multiple Growth Points: This method might encourage more growth on the remaining stem.
- Shorter Cuttings: Useful for propagating smaller sections of the plant.
- Can Lead to Weak Growth: Cuttings made above nodes may struggle to root without sufficient leaf mass.
Recognizing Healthy Nodes
When preparing to cut, it’s essential to identify healthy nodes to ensure successful propagation:
- Firmness: Healthy nodes should be firm, not soft or rotting.
- Appearance: Look for vibrant color and plenty of growth potential.
- Clean Cuts: Ensure the area surrounding the node is free from pests or disease.
Aftercare of Cuttings
Once you have made your cut, proper aftercare is crucial for successful rooting:
- Humidity: Maintain high humidity around the cuttings to encourage root growth.
- Light Conditions: Place in bright, indirect light to avoid stress.
- Watering: Keep the soil consistently moist, but not soggy to prevent rot.
Questions from Our Readers
Do you cut above or below the node to propagate?
To propagate a plant, you should typically cut just below the node. This is where new roots will form, making it an essential part of the propagation process.
Why is cutting below the node important?
Cutting below the node is important because it allows for root development at the location where the stem will be placed in water or soil. Nodes contain meristematic tissue, which is crucial for growth.
Can you propagate by cutting above the node?
While you can cut above the node, it is generally not advisable for propagation as it lacks the necessary cellular structure to develop roots effectively, resulting in a much lower success rate.
What should you do after cutting the stem below the node?
After cutting the stem below the node, it’s recommended to place it in water or a suitable potting mix to encourage root growth. Ensure the node is submerged or in contact with the medium for optimal results.
https://youtube.com/watch?v=KERR5Rhp2BQ

If you want to read more articles like Do You Cut Above or Below the Node to Propagate? Essential Tips for Successful Plant Propagation, we recommend you check out our Plants category.
Leave a Reply
Related Articles